> ## Documentation Index
> Fetch the complete documentation index at: https://docs.rayinai.com/llms.txt
> Use this file to discover all available pages before exploring further.
# Claude Desktop 安装与配置
> 在 Claude Desktop 中填入 RayinAPI 的请求地址和 API Key,无需登录 Anthropic 账号
Claude Desktop 是 Anthropic 官方桌面应用,包含 Chat、Cowork 和 Code 三种模式。在应用的开发者设置中填入 RayinAPI 的请求地址和 API Key,就可以不登录 Anthropic 账号直接使用
使用 RayinAPI 时,对话记录只保存在你的电脑本地,不会同步到 claude.ai
## 下载安装
下载 [Claude Desktop for macOS](https://claude.ai/api/desktop/darwin/universal/dmg/latest/redirect),打开 `.dmg` 文件,把 Claude 拖入「应用程序」文件夹
前往 [Claude 下载页](https://claude.com/download) 下载 Windows 安装包,运行后按提示完成安装
## 创建 API Key
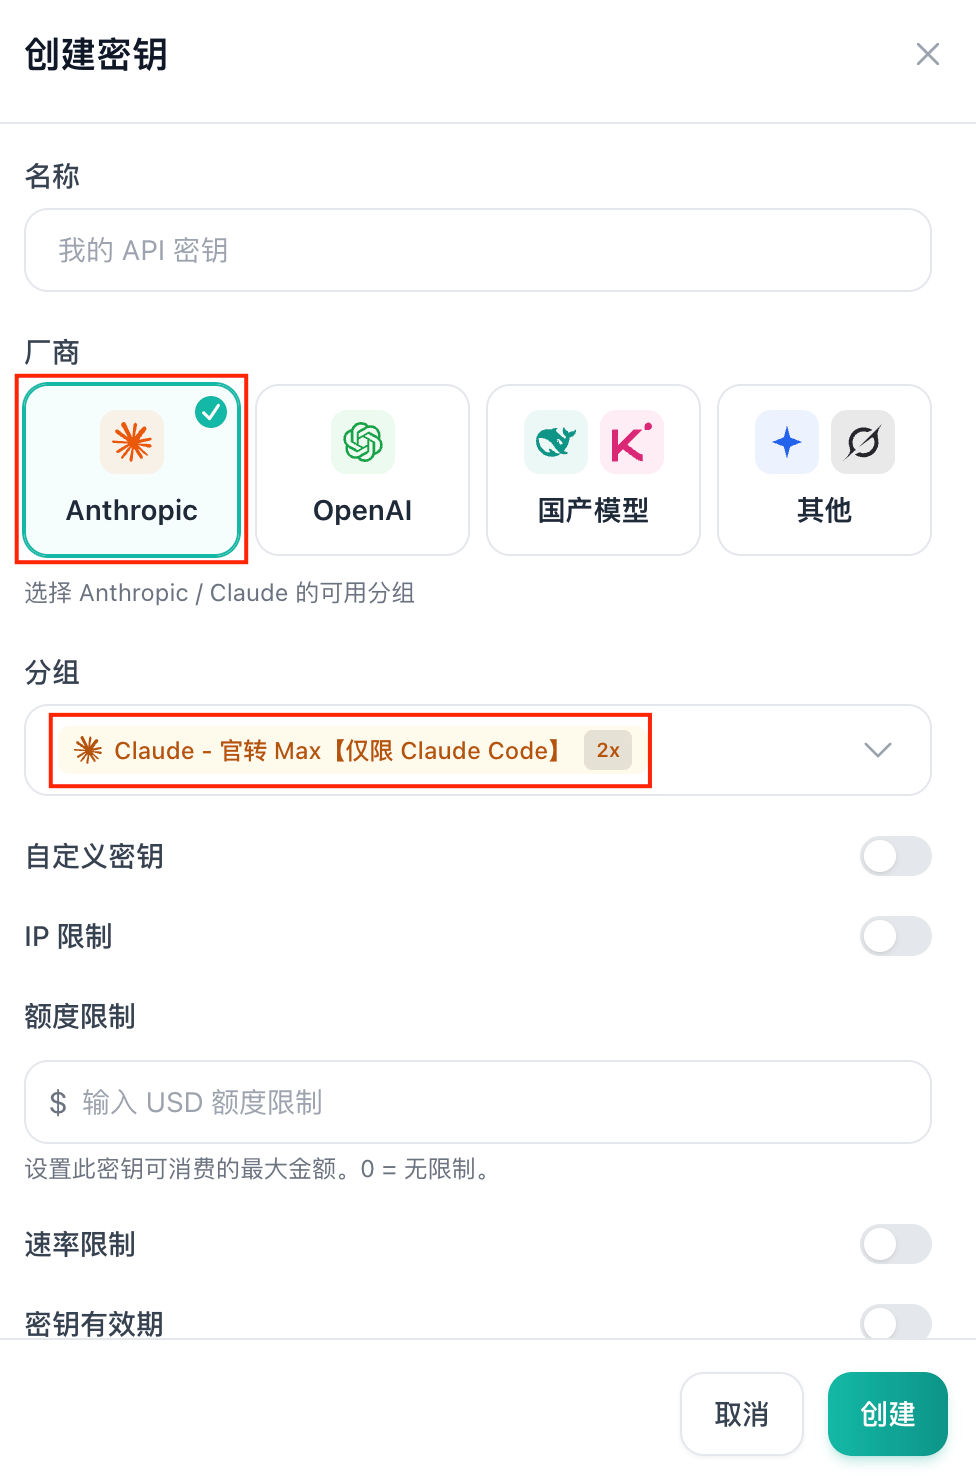
在控制台 [创建 API Key](/quickstart/api-key) 时,「厂商」选择「Anthropic」
 ## 配置 RayinAPI
打开 Claude Desktop,先不要登录
* **macOS**:在屏幕顶部菜单栏点击「Help → Troubleshooting → Enable Developer Mode」
* **Windows**:点击登录界面左上角的菜单按钮 ☰,选择「Help → Troubleshooting → Enable Developer Mode」
应用会重启,菜单中多出「Developer」菜单
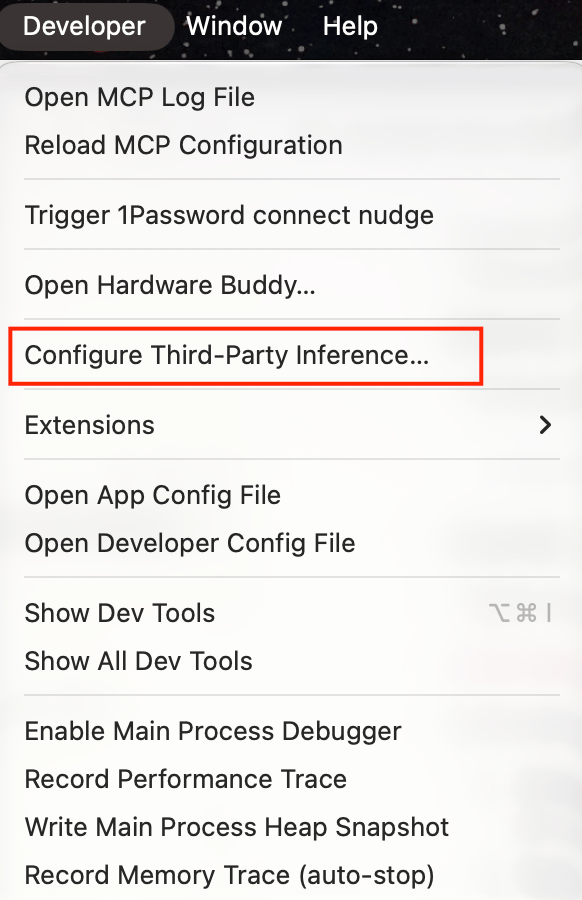
点击菜单「Developer → Configure Third-Party Inference…」,打开配置窗口
## 配置 RayinAPI
打开 Claude Desktop,先不要登录
* **macOS**:在屏幕顶部菜单栏点击「Help → Troubleshooting → Enable Developer Mode」
* **Windows**:点击登录界面左上角的菜单按钮 ☰,选择「Help → Troubleshooting → Enable Developer Mode」
应用会重启,菜单中多出「Developer」菜单
点击菜单「Developer → Configure Third-Party Inference…」,打开配置窗口
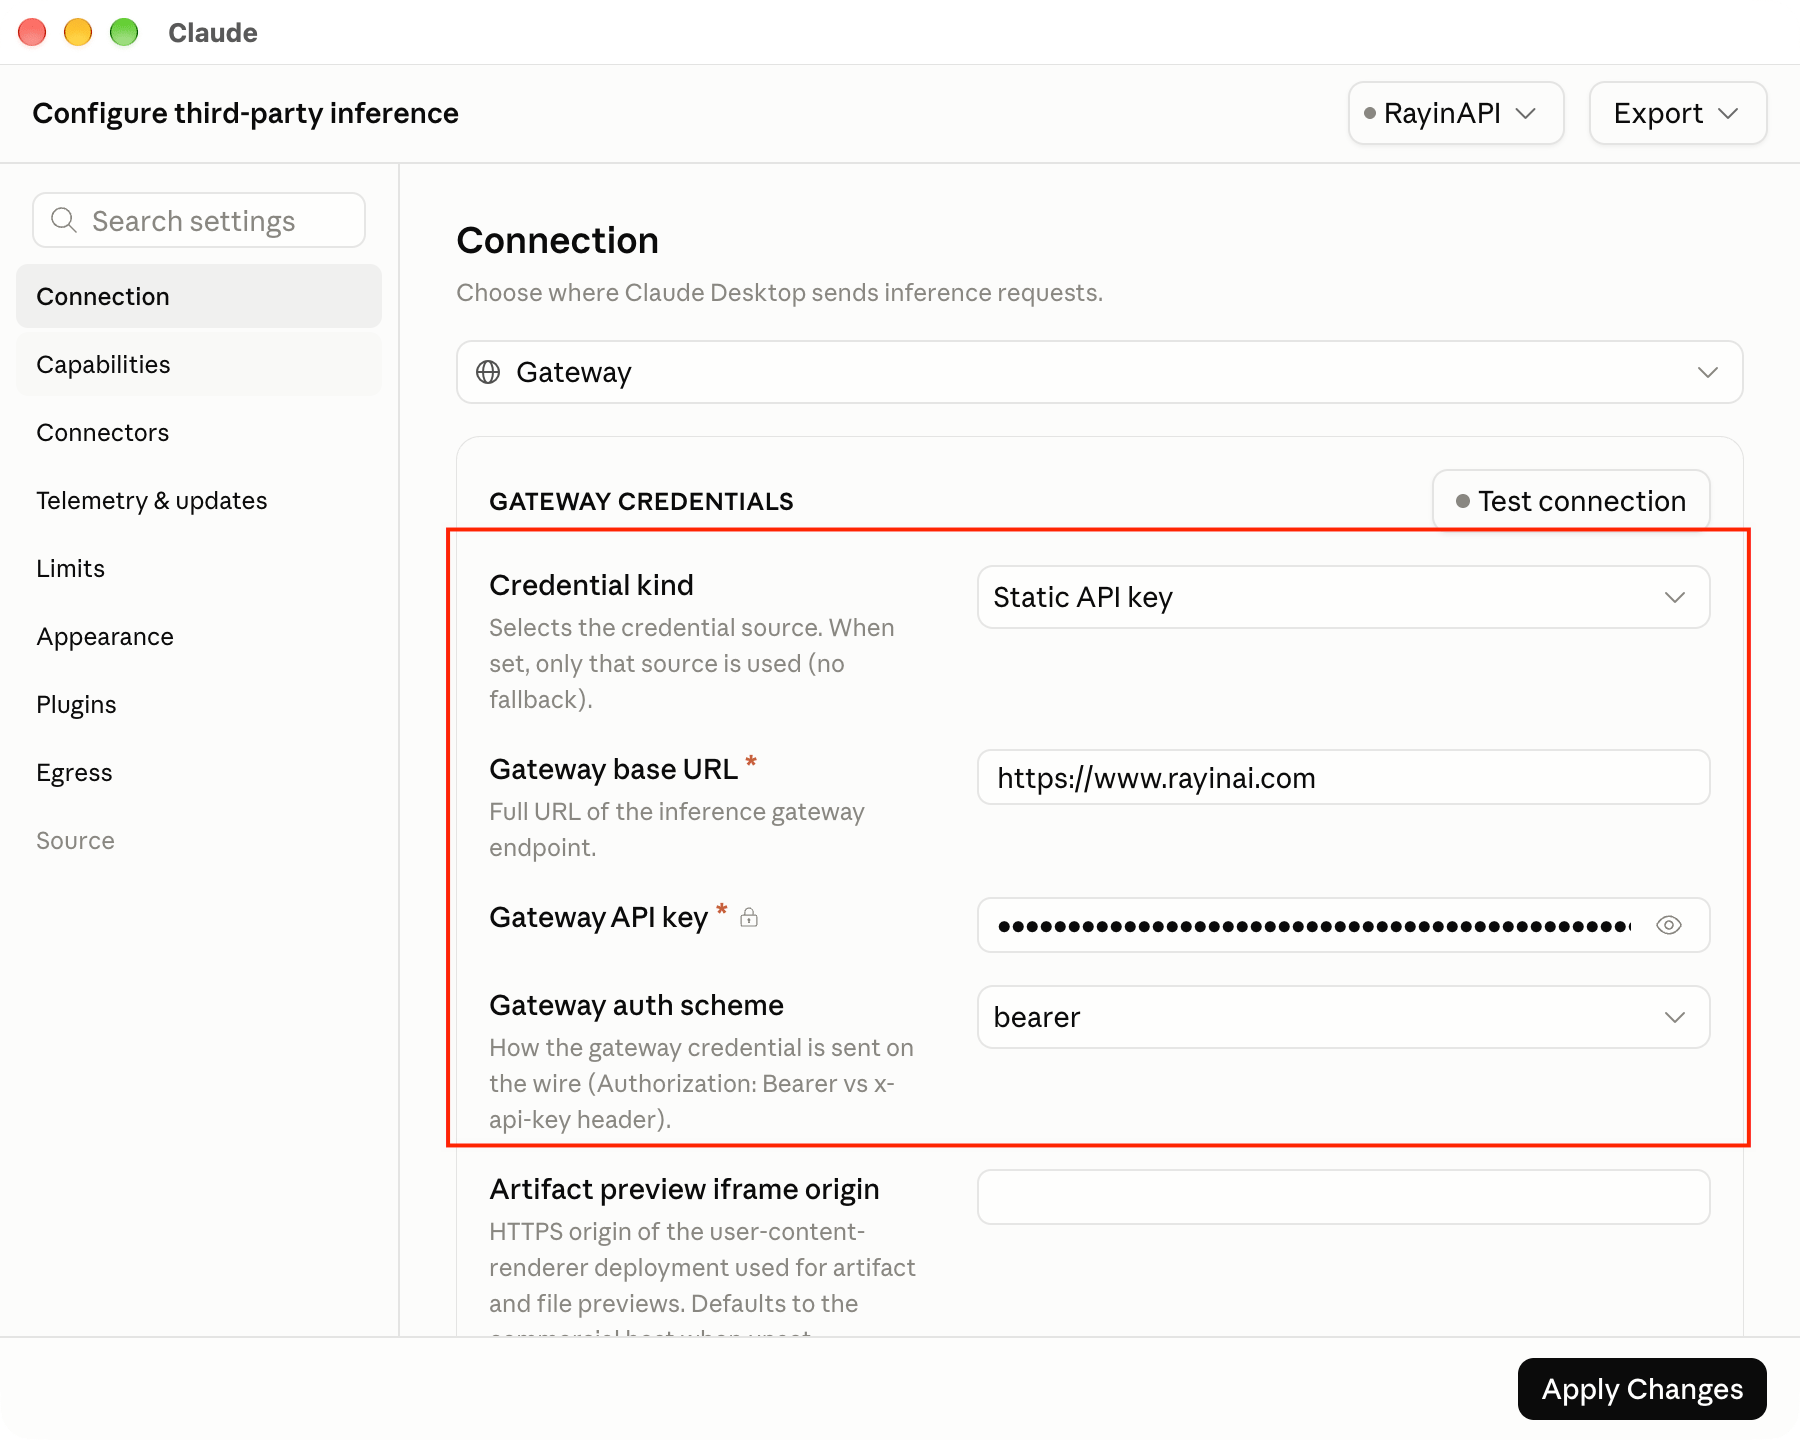
 在左侧选择「Connection」,把顶部的下拉框设为「Gateway」,然后在「GATEWAY CREDENTIALS」中填写
| 字段 | 填写内容 |
| - | - |
| Credential kind | `Static API key`(默认) |
| Gateway base URL | `https://www.rayinai.com` |
| Gateway API key | 你的 API Key([如何生成](/quickstart/api-key)) |
| Gateway auth scheme | `bearer`(默认) |
在左侧选择「Connection」,把顶部的下拉框设为「Gateway」,然后在「GATEWAY CREDENTIALS」中填写
| 字段 | 填写内容 |
| - | - |
| Credential kind | `Static API key`(默认) |
| Gateway base URL | `https://www.rayinai.com` |
| Gateway API key | 你的 API Key([如何生成](/quickstart/api-key)) |
| Gateway auth scheme | `bearer`(默认) |
 请求地址**不要**加 `/v1`,Claude Desktop 会自动拼接
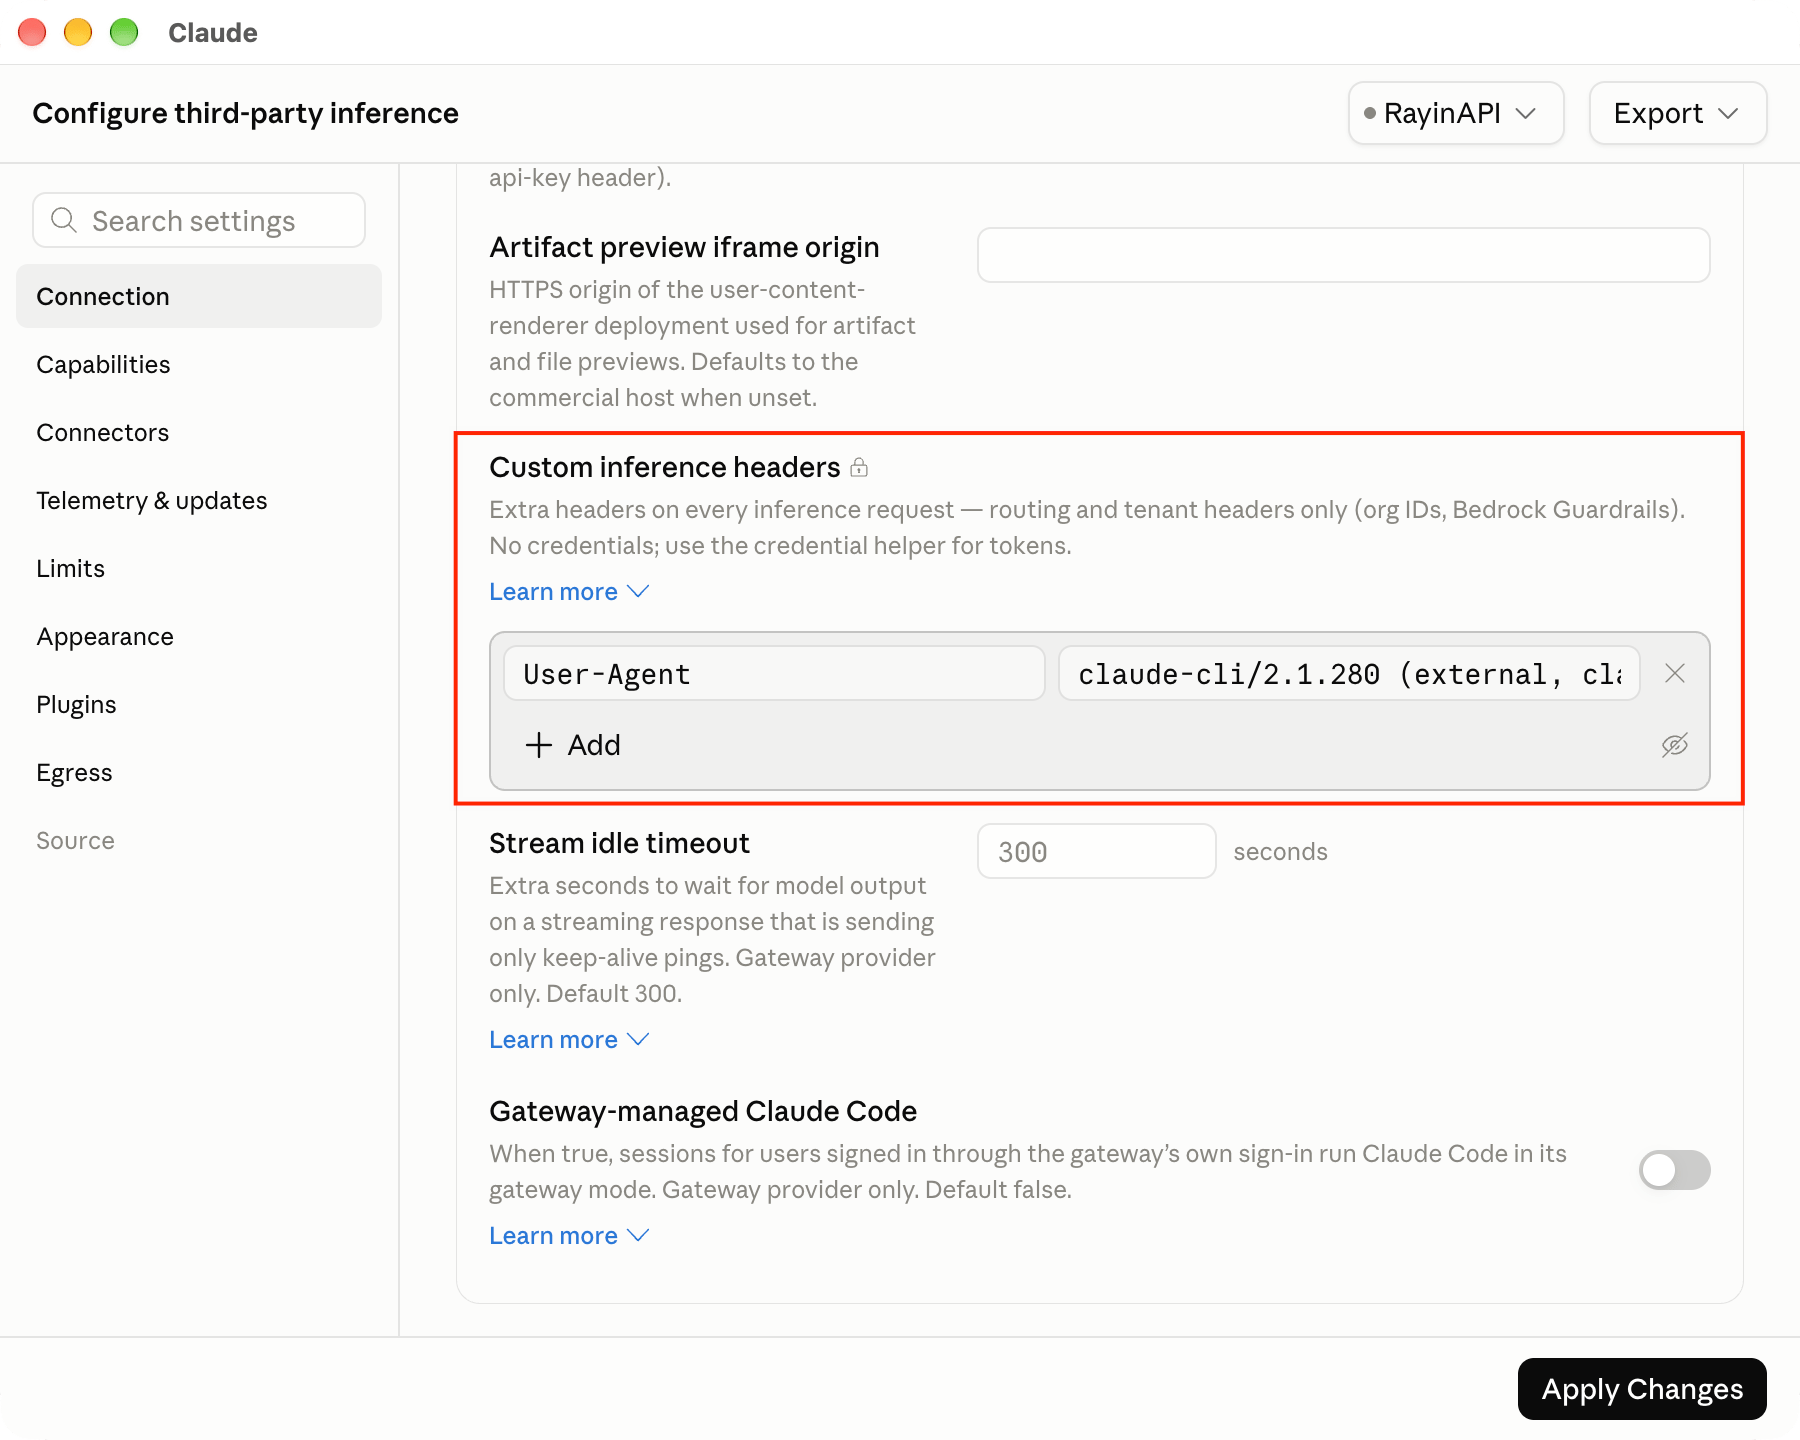
在同一页向下滚动到「Custom inference headers」,点击「+ Add」,左右两栏分别填写
| 左栏(名称) | 右栏(值) |
| - | - |
| `User-Agent` | `claude-cli/2.1.280 (external, claude-desktop-3p, agent-sdk/0.3.280)` |
请求地址**不要**加 `/v1`,Claude Desktop 会自动拼接
在同一页向下滚动到「Custom inference headers」,点击「+ Add」,左右两栏分别填写
| 左栏(名称) | 右栏(值) |
| - | - |
| `User-Agent` | `claude-cli/2.1.280 (external, claude-desktop-3p, agent-sdk/0.3.280)` |
 回到页面上方,点击「GATEWAY CREDENTIALS」右侧的「Test connection」,确认连接成功
点击「Apply Changes」,应用会写入配置并自动重启
不要点击「Export」,导出功能用于企业批量部署,个人使用不需要
重启后,在登录界面选择跳过 Anthropic 登录、使用刚才配置的 RayinAPI,即可进入应用
## 验证
进入应用后,在 Chat 中发送任意消息,能正常回复即表示配置完成
如果模型选择列表为空,打开「Developer → Configure Third-Party Inference…」,在左上角「Search settings」中搜索 `models`,手动添加模型,例如 `claude-opus-5-5`,然后再次点击「Apply Changes」
## 遇到问题
查看 Claude Desktop 配置相关的常见问题
This documentation is built and hosted on [Mintlify](https://mintlify.com), a developer documentation platform.
回到页面上方,点击「GATEWAY CREDENTIALS」右侧的「Test connection」,确认连接成功
点击「Apply Changes」,应用会写入配置并自动重启
不要点击「Export」,导出功能用于企业批量部署,个人使用不需要
重启后,在登录界面选择跳过 Anthropic 登录、使用刚才配置的 RayinAPI,即可进入应用
## 验证
进入应用后,在 Chat 中发送任意消息,能正常回复即表示配置完成
如果模型选择列表为空,打开「Developer → Configure Third-Party Inference…」,在左上角「Search settings」中搜索 `models`,手动添加模型,例如 `claude-opus-5-5`,然后再次点击「Apply Changes」
## 遇到问题
查看 Claude Desktop 配置相关的常见问题
This documentation is built and hosted on [Mintlify](https://mintlify.com), a developer documentation platform.